Begin the "Define" section by reflecting on what you know and want to know about this "Thing."
Have you ever tried to solve a complex problem without a plan? Usually something or someone gets forgotten, and time is wasted. In this "Thing," you will explore a better method of problem solving called Design Thinking . We will also review resources you might find in a Maker Space or classroom to help implement Design Thinking. Because Design Thinking is a process, it can be applied to any curriculum. Give this "Thing" a chance ~ we think you will find that you can easily modify your current “lessons” to incorporate Design Thinking.
Learning Objectives
Click on each title below to see detailed information.

Image by Arek Socha from Pixabay
In today’s dynamic world, workers need 21st-century learning skills to gather and evaluate evidence in the decision making process. One method of developing this workforce is to promote and implement Design Thinking in education.
Design Thinking is a mindset and approach to learning, collaboration, and problem solving. In practice, the design process is a structured framework for identifying challenges, gathering information, generating potential solutions, refining ideas, and testing solutions. It gives students a process to follow for solving problems that involves suggesting and testing solutions.

Now that you have an understanding of this "Thing's" connection to 21st-century learning, move on to the next section - Learn It.
What is Design Thinking?
According to A.J. Juliani, a leading expert in the field, “Design thinking provides a way to think about creative work. It starts with empathy, working to really understand the problems people are facing before attempting to come up with ideas and create solutions.” (How to Get Started Using Design Thinking in the Classroom) The results developed in this process are then shared with an authentic audience. For these reasons, Design Thinking can be found in all curricular areas from art to science and is a 21st-century learning skill.
You can learn more about Design Thinking by reading Juliani’s Beginner’s Guide to Design Thinking in the Classroom.
Design Thinking is a vital component in STEM education. When students use their content knowledge from math, science, engineering and technology to solve problems, they are participating in the STEM process. This is not the “scientific method.” It has evolved into a process where creativity and empathy play vital roles. If you would like more information about Stem education, read this article from Livescience.com or watch this video from The National Academies of Sciences, Engineering, and Medicine.
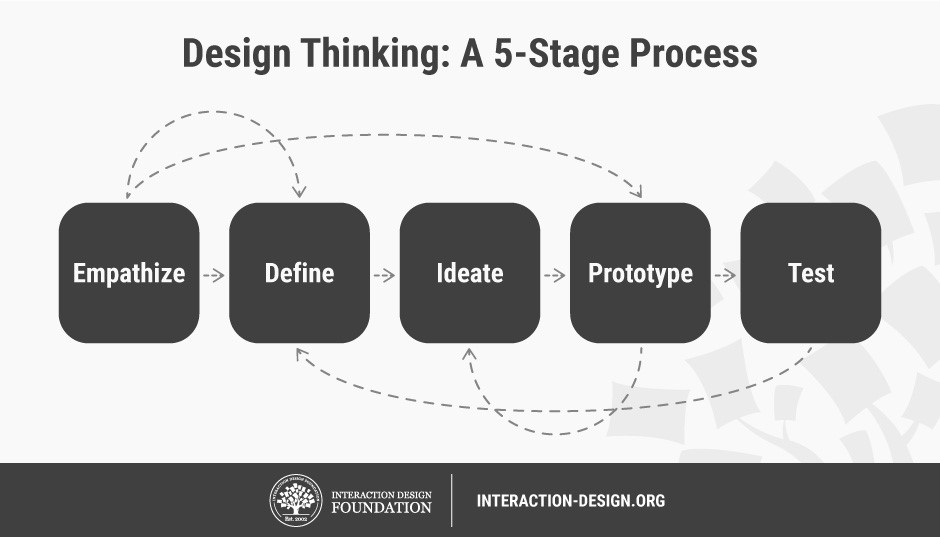
While there are many Design Thinking frameworks and models as described in A.J. Juliani’s Beginner’s Guide, this graphic from Teo Yu Siang and the Interaction Design Foundation focuses on just one: the 5-Stage Process.

Teo Yu Siang and Interaction Design Foundation. CC BY-NC-SA 3.0
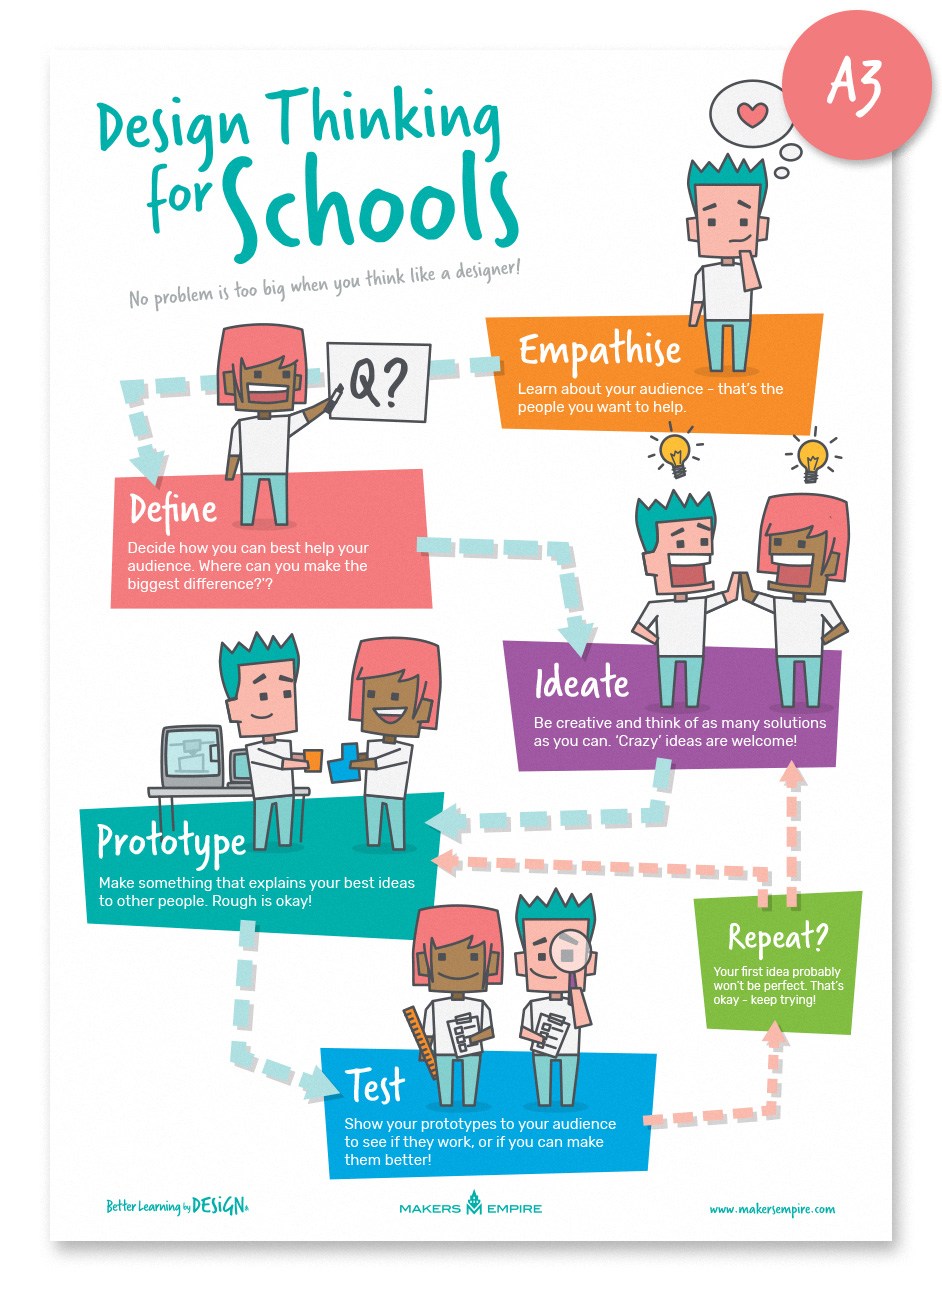
This process can also be visualized in this free poster from Makers Empire. Select the image to access a downloadable copy.
As these graphic organizers indicate, Design Thinking is non-linear, and the components are interconnected. Most importantly, Design Thinking starts with empathy because the goal is human centered. "Human Centered Design is all about building a deep empathy with the people you’re designing for; generating tons of ideas; building a bunch of prototypes; sharing what you’ve made with the people you’re designing for; and eventually putting your innovative new solution out in the world.” (IDEO, n.d.)
Another expert on this topic is John Spencer. His model called the Launch Cycle, takes these 5 principles and applies them to the classroom setting. His video about the Launch Cycle framework for Design Thinking is a must watch. Select image below to view/listen.
Why Should Educators Use Design Thinking in the Classroom?
In her Edutopia article Design Thinking in Education, Susie Wise states that “as a model for reframing methods and outcomes, design thinking reconnects educators to their creativity and aspirations for helping students develop as deep thinkers and doers.”
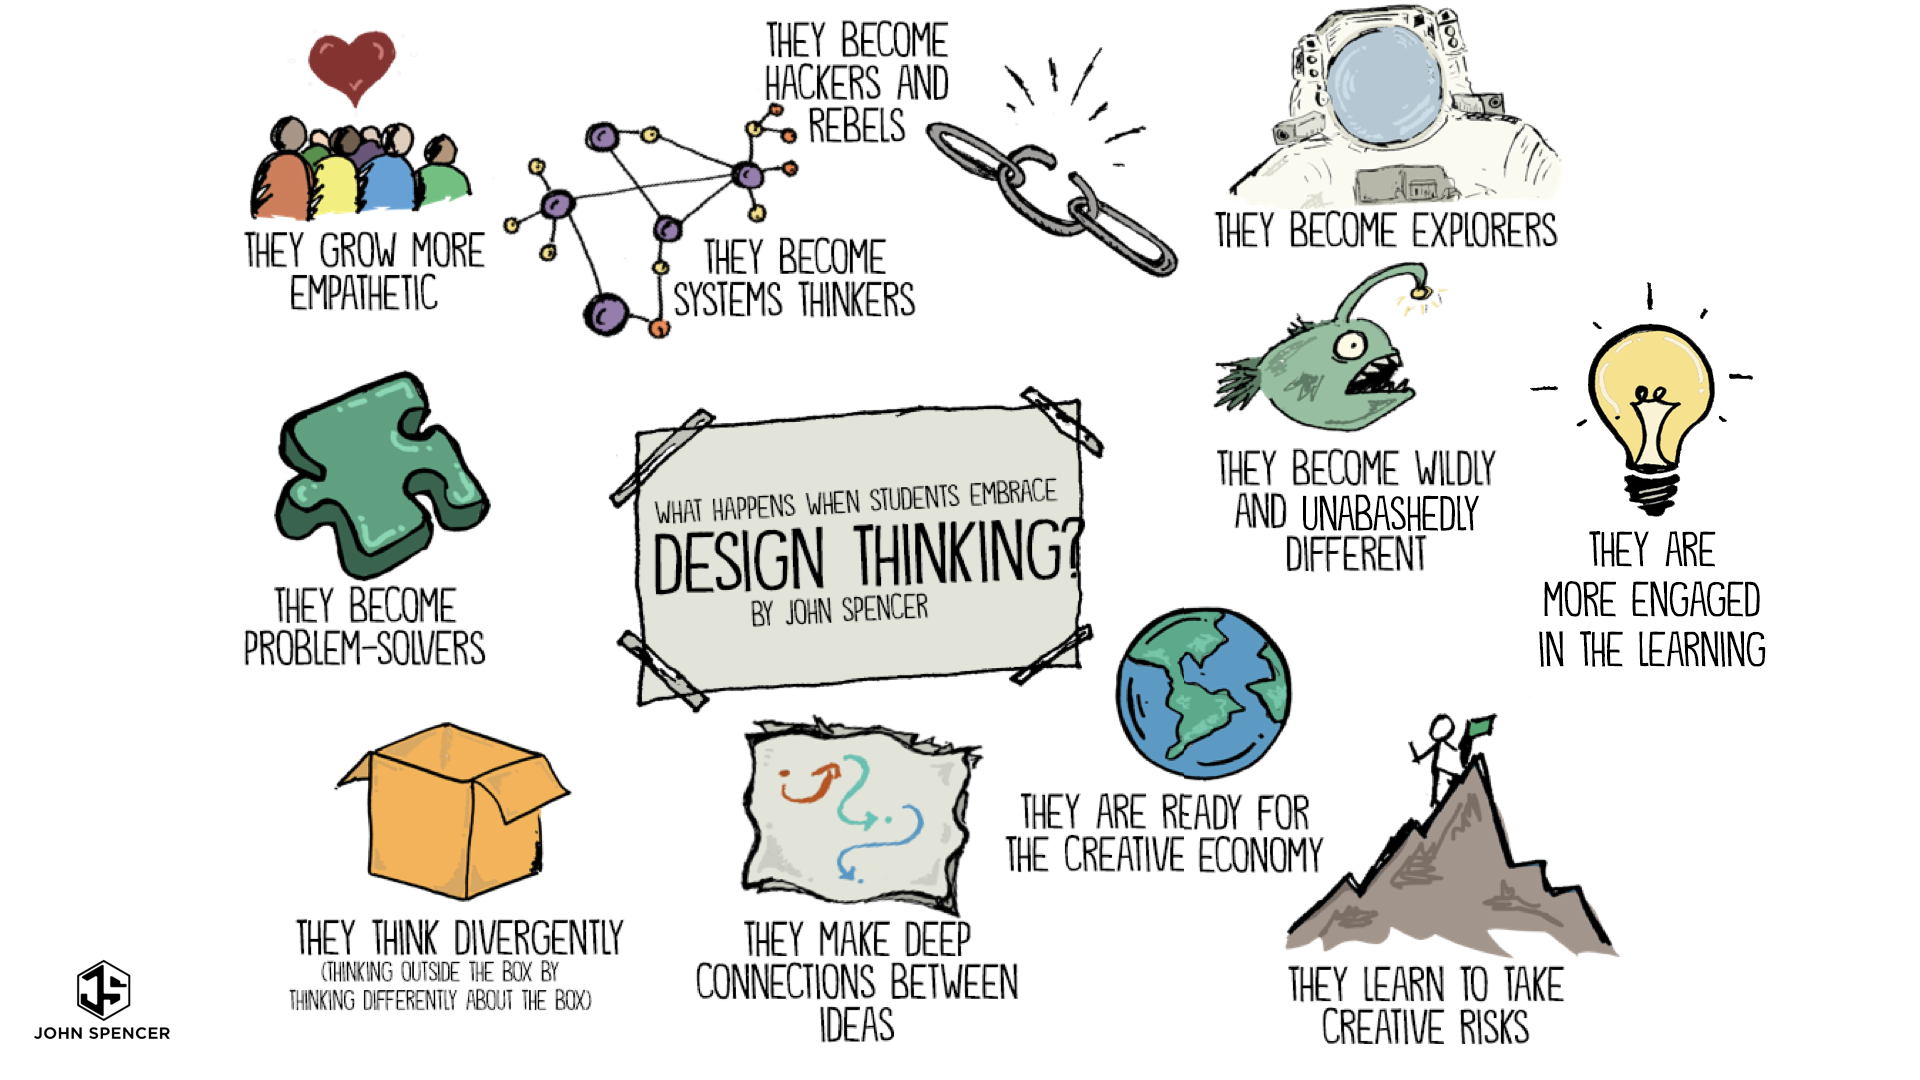
John Spencer says “when students embrace design thinking, they develop a maker mindset. They define themselves as problem-solvers.” These ideas are depicted in his infographic:

Author/Copyright holder: John Spencer , CC licence: BY
For more reasons why you should incorporate Design Thinking in your classroom, read John Spencer’s article - Ten Things That Happen When Students Engage in Design Thinking.
Lastly, Design Thinking is not just for high school and college aged learners; it has a place in all classrooms. According to Makers Empire, students learning about Design Thinking in primary, elementary and middle schools will be able to:
- Identify problems and reframe them as actionable
- Understand the value of collaboration and feedback
- View setbacks and failures as valuable learning moments
- Appreciate the value of hard work and persistence
- Develop self-belief as problem solvers
- Develop empathy
- Develop a growth mindset
- Develop entrepreneurial and community-minded behaviors
- Focusing on both future and solutions-oriented

Now that you have an understanding of the Design Thinking process, move on to the next section - See It.
Design Thinking In-Action
The following videos demonstrate the 5-stages of Design Thinking as it applies to a particular lesson/project. Choose the one most appropriate for your situation and review it using this Lesson Evaluation Template
Lower Elementary: Forbes Primary School Solves the Problem of Identical School Bags
Select the image below to view/listen.
Upper Elementary: St. Stephens School Students Helped Their Teacher’s Toddler
Select the image below to view/listen.
7-8 Grade: Design Thinking: Prioritizing Process Skills to Design a Sport
Select the image below to view/listen.
9 - 12: Maker Challenge - Create an Arcade Game
Select the image below to view/listen.
When designing a lesson that incorporates Design Thinking, keep in mind the 5 stages as exemplified in the Lesson Evaluation Template.
Here are some suggestions about Design Thinking lessons from John Spencer - Design Thinking Can Work in Any Subject. We added some hyperlinks to advance the learning. Note: most projects include reading and writing components.
- Reading: Book Blog, CuriosityCast (an inquiry-based podcast),
- Writing: Student Blog, Class Online Magazine, NaNoWriMo
- Social Studies: Service Learning Project, History-Themed Theater
- Economics: Create a Product (similar to Shark Tank) Projects
- Math: Create a Board Game, creating a Scratch game
- Science: Solar Energy Designs, Engineering Projects, Science Fair
- PE: Design a Sport, Create a Fitness Campaign
- Art: Class Art Magazine, Service-Learning art projects
- Music: Music Video Projects
- Foreign Language: Design-oriented Tutorial Partnerships
- Computers: Multimedia Composition Projects, Digital Product Cycle
STOP & THINK
Now it is your turn. Think about an area in your curriculum where students could solve a problem in a project that you have done before. Take a lesson from that area/project and modify it to incorporate the Design Thinking process. Use the questions from the Lesson Evaluation Template to guide you through this exercise.

Now that you have an seen the Design Thinking process in action, move on to the next section - Try It.
Applications of Design Thinking
Makerspace
A physical space with hands on learning for making, exploring and sharing as well as helping with critical thinking skills and boosting self-confidence. For more information visit Makerspaces.com or read “What is the Point of a Makerspace?” by Jennifer Gonzalez.
Makerspaces provide a location for testing ideas and therefore can be used for all subjects. To get ideas on how, read John Spencer’s blog - “What do maker projects look like in each subject area?”
Even though most makerspaces involve some sort of financial commitment, they do not have to be expensive. To learn more, explore the ISTE article, “Create a school makerspace in 3 easy steps” by Nicole Krueger.
For further investigation, view these video examples of Makerspaces:
Elementary Level (select the image below to view/listen)
Middle School/Junior High Level (select the image below to view/listen)
High School Level (select the image below to view/listen)
Virtual Reality
VR is an interactive experience situated solely in a virtual environment where the sensory stimuli (sights, sounds, etc.) are provided by a computer, and the user’s actions partially determine what happens in the environment. VR is a “fully immersive” experience where participants usually wear goggles or headsets to enter a completely virtual world. Google Cardboard, Oculus Rift, and other “paid-for” options exist for utilizing VR in the classroom. Students often use VR to help them visual components of the Design Thinking process. For example, a student might use VR to imagine what it would be like to to use a wheelchair to go down a flight of stairs. Read this Commonsense.org article for five research-based ways to use VR for learning. For MANY more suggestions on how to use VR in the classroom, visit Thing 12 - Interactive Learning.
Augmented Reality
AR combines actions that are situated both in the real-world and the virtual. AR utilizes QR codes, video overlays, and gaming experiences (similar to Pokémon) created by apps, websites, and objects like the Merge Cube. Think of these as “pop-up” layers added to a viewing screen that add to reality. When they are used in the Design Thinking process, they help visualize a new way of thinking. For example, AR can be used to solve problems such as generating community support for a new interactive walking trail or increasing accessibility at a museum. In fact, many museums and historical sites use AR to enhance the learning by adding QR codes or other interactives. For classroom lesson ideas, read this article from ISTE - 25 Resources for bringing AR and VR to the Classroom. For MANY more suggestions on how to use AR in the classroom, visit Thing 12 -Interactive Learning.
This is the last section of "Thing" 16's Define playlist. Now would be a great time to revisit your Reflection Document and think about what you learned in this "Thing." Capture a screenshot of your results from the Knowledge Check and post them in your Reflection Document. As you move forward, consider the following: How might you use this in your own professional practice? What goals might you set for yourself, including activities, timelines, and evaluation? What connections did you make to the ISTE Standards or your own content area standards? How will you monitor your own progress towards these goals? Then proceed to the next section.
