Begin the "Define" section by reflecting on what you know and want to know about this "Thing."
Empowering students to demonstrate their competency in a method of their own choosing is the cornerstone of personalized learning. This learning then becomes authentic by sharing the ideas with the “world.” In this "Thing," you will investigate the pedagogy and tools that will enable your students to become Creative Communicators who confidently share evidence of their knowledge.
Learning Objectives
Click on each title below to see detailed information.
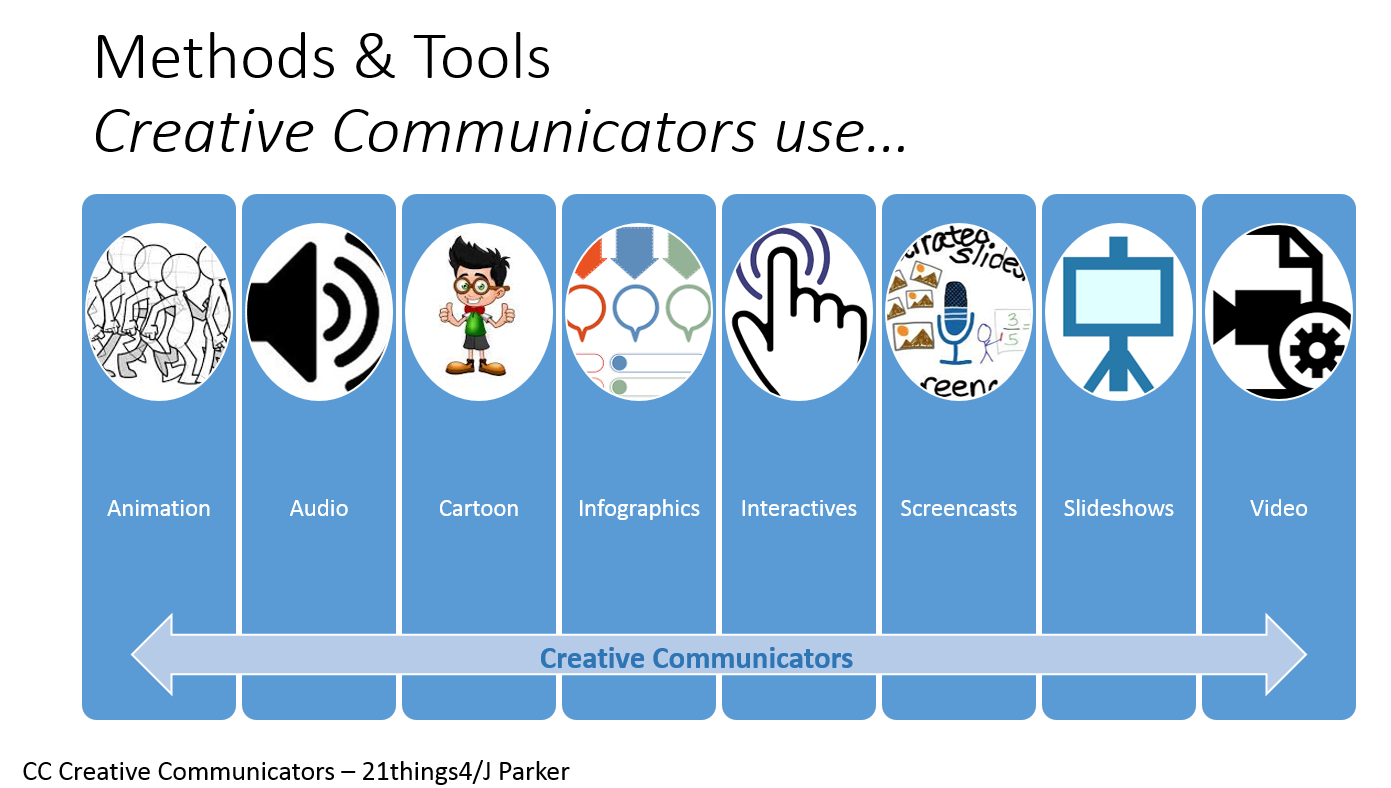
Communication comes in many forms. In this "Thing," we will focus on these:
Before you explore this "Thing," we recommend that you become familiar with these terms and concepts:
Choice board - is a graphic organizer that allows students to choose different ways to learn about a particular learning objective or to demonstrate his/her knowledge about a learning objective.
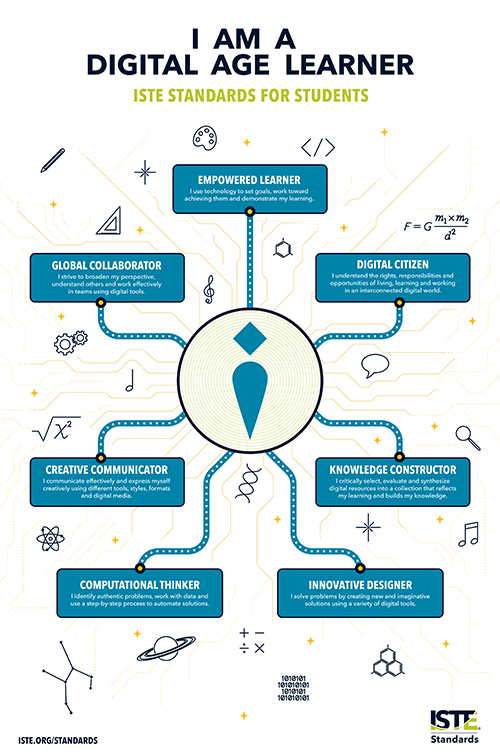
Creative Communicator (Part of a Digital Age Learner - ISTE) - is able to communicate effectively and express oneself creatively using different tools, styles, formats and digital media.
Digital Age Classroom - is one containing engaging instructional activities by using electronic devices and platforms to teach students.
Personalized Learning - is an educational strategy chosen by the student that is intended to address the distinct learning needs, interests, and backgrounds of the student as an individual.
HyperDoc - an interactive document that takes students on a tour of content.
21st Century Learning Skills - can be summarized as the “Four Cs”— critical thinking, communication, collaboration, and creativity.
Now that you have an overview, move on to the next section - What is a Creative Communicator?
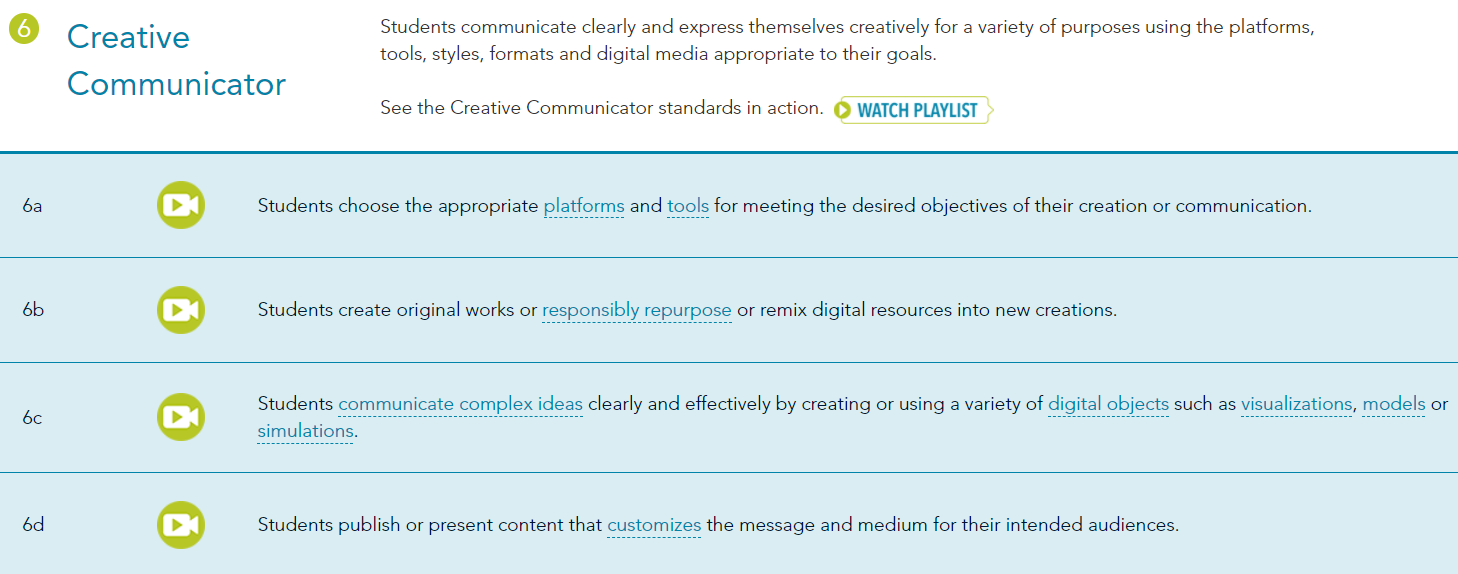
When designing a lesson that requires students to create a digital artifact to demonstrate competency, you are really asking them to become Creative Communicators. What is a Creative Communicator? According to the International Society for Technology in Education (ISTE), Creative Communicators “communicate clearly and express themselves creatively for a variety of purposes using the platforms, tools, styles, formats and digital media appropriate to their goals.”
Start with the End in Mind
To learn how to provide opportunities for students to be Creative Communicators, it is best to start with the end in mind. Explore these short videos from ISTE to see what it means to be a Creative Communicator, and how it would look in the classroom. (Click on image below to access the videos.)
Now that you have an idea of what Creative Communication in the classroom can look like, you can break it apart in order to understand how to teach it.
To begin, you have to know that there are four elements for creating an engaging assignment where students can be Creative Communicators utilizing 21st Century Learning Skills. Teachers then need to understand how to incorporate these elements:
- Student Choice - using something such as a rubric or choice board to give students options to demonstrate mastery. Options go beyond presentations to include infographics, animation, videos, web design, and more. Students should be given choices in their process, platform, and product.
- Content - Artifacts or assignments must be competency/standards driven and be assessed based on a student’s ability to show knowledge about the content, standard or competency. Students should be encouraged to set goals, monitor their own progress, and reflect on their own learning.
- Creativity - embraces differentiation and UDL principles in your lesson. Creativity, at its core, is artful design without too much emphasis on the bells and whistles. It should allow students to experiment with platforms, processes, and products. Creativity, however, should not overshadow content.
- Skills & Abilities - Student work must also be an accurate display of effort, initiative, and work habits. Students are encouraged to perform to the best of their abilities and push themselves to learn new technologies and content. Personalizing the learning provides options where students can perform to the best of their abilities (the low riders, middle gliders, and high flyers).
Now that you have an understanding of what it means to be a creative communicator, let's take a deeper dive into each of the four elements listed above. To start, move on to the next section - Student Choice - Personalized Learning & Choice Boards.
One size definitely does not fit all in a Digital Age Classroom. Varying devices, platforms, skills, and goals create a unique opportunity for personalizing the learning. According to The Glossary of Education Reform, “Personalized learning is intended to facilitate the academic success of each student by first determining the learning needs, interests, and aspirations of individual students, and then providing learning experiences that are customized—to a greater or lesser extent—for each student.” Unlike UDL (see Thing 20), Personalized Learning starts with and is driven by the Learner.
This educational practice has been around since the 1960s, but its connection to the 21st Century classroom took roots with the U.S. Department of Education's National Educational Technology Plan (2010). Educators have been improving on it ever since. In 2014, a four-part "working definition" was outlined and is summarized here:
Four Parts of Personalized Learning
- Competency Based Progression - where each student’s progress toward clearly-defined goals is continually assessed. A student advances and earns credit as soon as he/she demonstrates mastery. Students master skills at their own pace. A Creative Communicator lesson could accomplish this part with guiding rubrics and formative assessments.
- Flexible Learning Environments - Student needs drive the design of the learning environment whether brick and mortar or virtual. All operational elements—staffing plans, space utilization and time allocation—respond and adapt to support students in achieving their goals. There are many possibilities, but one example of how a Creative Communicator lesson could accomplish this part is by implementing the Station-Rotation Blended Learning Model.
- Personal Learning Paths - is an approach that emphasizes learner-specific goals related to the learning objective, as well as preferences for the kinds of products they produce or the manner in which they demonstrate competency of an objective. They are created when students are encouraged to set and manage their individual academic goals. While it is daunting for most students to start personalizing their learning completely, teachers can help by suggesting some customized learning pathways that offer students choice in the way they learn and the products they create. However, for a personal learning path to be truly successful for students, they must feel as though they are in control of their experiences which can be accomplished when students have a direct say in the learning process. A Creative Communicator lesson could accomplish this part by using choice boards that steer students in the right direction while still giving them a “say."
- Learner Profiles - generate data that helps teachers know more about their students. It is beneficial for both the student and teacher to understand the student's interests and strengths so that decisions can be made for creating appropriate Flexible Learning Environments and Personal Learning Paths. These profiles can be created and collected through various means such as interest surveys, discussions, projects/infographics depicting interests, videos demonstrating skills, and so many more. This part is usually the first step in a Personalized Learning plan. A Creative Communicator lesson could accomplish this part by accessing the data from the “beginning of the year” learner profile survey. Here’s an example of a Learner Profile Survey for Grades 1-3.
When all four parts are used in a lesson, Student Agency will occur. “Student agency refers to learning through activities that are meaningful and relevant to learners, driven by their interests, and often self-initiated with appropriate guidance from teachers. To put it simply, student agency gives students voice and often, choice, in how they learn.” (Student Agency - What is Student Agency? - EdWords)
For more information regarding Personalizing Learning, view this brief video by Richard Culatta.
To personalize the learning and have student agency in a Creative Communicator lesson, consider giving students choice about platform, process, and product:
- platform - tools, apps and programs to complete the assignment
- process - individual or group, synchronous or asynchronous, etc.
- product - digital artifacts for demonstrating competency come in many forms
Although the content and standards drive the lesson creation, Personalized Learning drives how students will interact with the lesson. The final Creative Communicator digital artifact will then be a true representation of student competency. To Summarize, students can demonstrate competency and benefit from personalized learning when they become a Creative Communicator who chooses the platform, process and product.
How does a teacher personalize the learning? Choice Boards!
Choice Boards
Teachers can provide choices in a visually appealing format through Choice Boards. To get started, explore one teacher’s perspective on using Choice Boards with students.
This video depicts how you can easily create a Choice Board and provides a template to get started. Select the image to view/listen.
Choice boards come in many different styles. Kaitlin Tucker, author of “Blended Learning in Action” explains how to design Choice Boards in your online classroom. Also, Allison Zmuda, a nationally known expert on Personalized Learning provides several examples of how to incorporate Choice Boards on her website, “Learning Personalized.”
A great way to get started using Choice Boards is to explore Pinterest for some ideas. (484 Best Choice Boards images | Choice boards, Teaching, Reading classroom) For an overview of some other popular sources and more examples, explore this presentation - Sample Choice Boards.
Now that you have an understanding of how providing student choice encourages creative communication, move on to the next section - Interactive & Engaging Content with HyperDocs.
Teachers are Creative Communicators when they implement an interactive, personalized, and engaging lesson. One way to accomplish this element is to create and utilize HyperDocs.
HyperDocs
To gain a better understanding, read this blog - HyperDocs Templates for Getting Started.
Learn to create your own by exploring Samples of HyperDocs for Every Subject and viewing this How to Video with an accompanying worksheet. Select the image to view/listen.
Besides creating your own HyperDocs, you can find some online that are free to use and edit. Start by visiting the HyperDocs Academy. Click on their logo below to access their website.

This resource also has Samples of HyperDocs for Every Subject.
Matt Miller, popular author of “Ditch This Textbook” and “Teach Like A Pirate” series shared 14 ideas for HyperDocs that are also worth exploring.
Now that you have an understanding of how providing interactivity with HyperDocs encourages creative communication, move on to the next section - Tools That Prompt Creativity.
When designing a Creative Communicator lesson, consider how you will give students the choice in the platform, process and the product. All three of these components involve creativity.
Platform: Methods for Creative Communicators
A good Creative Communicator lesson gives students a choice in how they want to present their knowledge ~ the platform. The best platform meets the learning style as well as interest of the individual student. Here are the 7 platforms from which to choose:
- Animations are cartoons that “move”. For more information about using animation in the classroom, visit Thing 3.
- Audio recordings bring out the power of the spoken word. They allow students who might otherwise struggle with the written word to express themselves. Podcasts are the most common form. For more information about using audio in the classroom, visit Thing 3.
- Cartoons allow expression without the constraints of using a real image. They also allow the imagination to show something that is not real.
- Infographics are posters, flyers, handouts, etc. They are intended to deliver information in an eye catching fashion. For more information, visit Thing 3.
- Interactives are web based applications where students use creativity to explore a concept. For more information about using interactives in the classroom, visit Thing 12.
- Screencasts are recordings of a person providing audio to what is being presented on the computer screen.
- Slide shows are presentation tools that allow for information to be shared with a large group. For information about most commonly used slide show tools, visit Thing 5.
- Videos are usually recordings of live action. For more information about using videos in the classroom, see Thing 3.
For the Pros and Cons of each of these platforms, refer to the Comparison of Creative Communicator Methods document.
Process: Tools for Creative Communicators
There are a multitude of tools that can be used to create EACH platform. The tool a student chooses to use is usually based on the student’s abilities. Again, it is the goal of Personalized Learning to let the student decide how best to demonstrate their own knowledge, however, the teacher might have to intervene and make suggestions in order to help the student succeed.
This document contains a list of the most commonly used Creative Communicator Tools - it’s a must see!
Product: Digital Artifact & Its Interaction with an “Audience”
All of these questions should be answered before the product is created.
- What will the final product look like?
- Will it be a new creation, a revision of another’s idea, a model, etc?
- Will the audience influence the final product's appearance? Would you present a 10 page essay to a group of first graders?
- How will the student share their digital artifact
- Will the audience influence the method of sharing?
- Will the audience interact with the artifact synchronously or asynchronously?
- How can social media be used to share the artifact? Could you "Tweet" your thoughts about the artifact to further the discussion?
Now that you have an understanding of how picking the right tool encourages creative communication, move on to the next section - Reflecting & Assessing Skills & Abilities.
When designing a Creative Communicator lesson, the teacher needs to provide opportunities for students to create goals, monitor their own progress, and assess themselves given criteria (e.g. rubrics) or peer review.
To help students “learn along the way”, the lesson should contain these elements:
- Goal Setting: This could be accomplished by having students set SMART goals that are Specific, Measurable, Attainable, Realistic, and Time-bound. These goals will help the student keep track of their own personal pathway. The lesson could include a teacher created goal setting document or use a tech tool like the Any.do app.
- Self-Reflection: During the lesson, provide opportunities for students to give feedback on what they know, understand, or are able to do. This could be in the form of journaling, peer conversations, or a student-teacher interview.
- Progress Monitoring: This formative assessment can come in many forms; warm-ups, exit tickets, quizzes, discussion boards, etc. The goal however, should be for the student to have access to their “score” so that they can decide how to proceed with the project. It can also come in the form of a KWL. These results can also help the teacher decide if the student is on the correct pathway to demonstrate competency. See Thing 19 for more ideas.
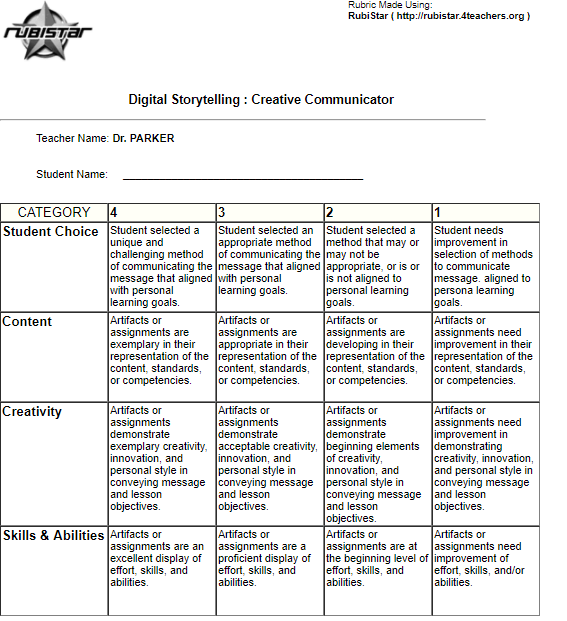
- Rubrics: Rubrics provide students with clear expectations about what is required in order to demonstrate their competency about the content. See Thing 19 for more information or try these free rubric makers: Rubistar, iRubric, Rubric-Maker and more.
A Creative Communicator lesson should also consider the assessment of the artifact and the student effort and work habits.
The assessment of a digital artifact should critique elements of
- student choice (did they choose the right tool)
- content (did they meet the minimum requirements of what message should be conveyed)
- creativity (were they creative in their representation of the content)
- skills/abilities (was the digital artifact an accurate representation of their skills and abilities)
Here’s an example of a rubric that meets these specifications:
Now that you have an understanding of assessing creative communications, move on to the next section - Putting the Pieces Together.
Putting the Pieces Together: Designing a Creative Communicator Lesson
Step One - start the personalized learning process at the beginning of the school year by administering a personal interest and the abilities survey. From the results, determine which Creative Communicator platforms and tools students have used or want to use.
Step Two - As you present your normal content, utilize the Creative Communicator platforms and tools that interest your students. You have to deliver content anyway, why not be a Creative Communicator yourself while modeling the different tools. E.g.: When first introducing a topic, why not start with a CARTOON. What types of leading questions could this cartoon inspire about the topic of Force and Motion?

Image by 3282700 from Pixabay
Step Three - Identify a content standard that would lend itself to student exploration making it easier for them to choose their own learning pathway. E.g.: NGSS Standard MS-PS2 -1 (Motion and Stability: Forces and Interactions) This standard asks students to identify the relationships between force and motion during an interaction. This is very open ended; interactions could be anything - proton-proton repulsion, bumper cars, seat belts, etc. This type of standard not only allows for multiple pathways of expression, it opens the door to creativity.
Step Four - Create a HyperDoc that contains the main content from the standard that you want students to know, understand and do. This allows the student to explore the content in a manner that makes sense to their learning style. Maybe they read the article before watching the video, or they already understand the concept, so they choose to do the interactive experiment first. So many possibilities for interacting with the content. That’s personalized learning. E.g.: Here’s a sample HyperDoc for Force and Motion.
Step Five - Have a plan; think about how each communication platform could be used by a student to demonstrate their knowledge. With this information you will be able to make a better choice board. For example, how much time would a podcast have to be in order to get the point across? One minute, two? Here’s an example of platform pre-planning using the Force and Motion example.
Step Six - Create a Choice board that outlines the options for students with the platform, process and product. You might find one online that matches what you are doing or one that can be easily modified. (Pinterest!)
Step Seven - Enjoy watching students take control of their own learning. Take this time to interact personally with each student. Maybe schedule a conference during class time, or circulate the “room” asking leading questions to guide students to make good conclusions about the content.
Step Eight - Help students self-reflect on their learning. Use your favorite technique and tool. How about a KWL exit ticket with Quizizz? The next time you have your students demonstrate knowledge as a Creative Communicator, also have them Set Goals for their learning. By adding in one new idea each time, baby-stepping, students won’t feel overwhelmed.
Step Nine - Assessment using a rubric. This type of lesson lends itself to authentic assessment where you are looking to see -
- student choice (did they choose the right tool)
- content (did they meet the minimum requirements of what message should be conveyed)
- creativity (were they creative in their representation of the content)
- skills/abilities (was the digital artifact an accurate representation of their skills and abilities).
- To save time, you could create one Creative Communicator rubric that is generic for any content standard. See previous tab in this playlist for an example of a generic rubric.
This is the last section of "Thing" 14's Define playlist. Now would be a great time to revisit your Reflection Document and think about what you learned in this "Thing." Capture a screenshot of your results from the Knowledge Check and post them in your Reflection Document. As you move forward, consider the following: How might you use this in your own professional practice? What goals might you set for yourself, including activities, timelines, and evaluation? What connections did you make to the ISTE Standards or your own content area standards? How will you monitor your own progress towards these goals? Then proceed to the next section.